Essential Pumpkin Prep Tools: Your Complete Guide
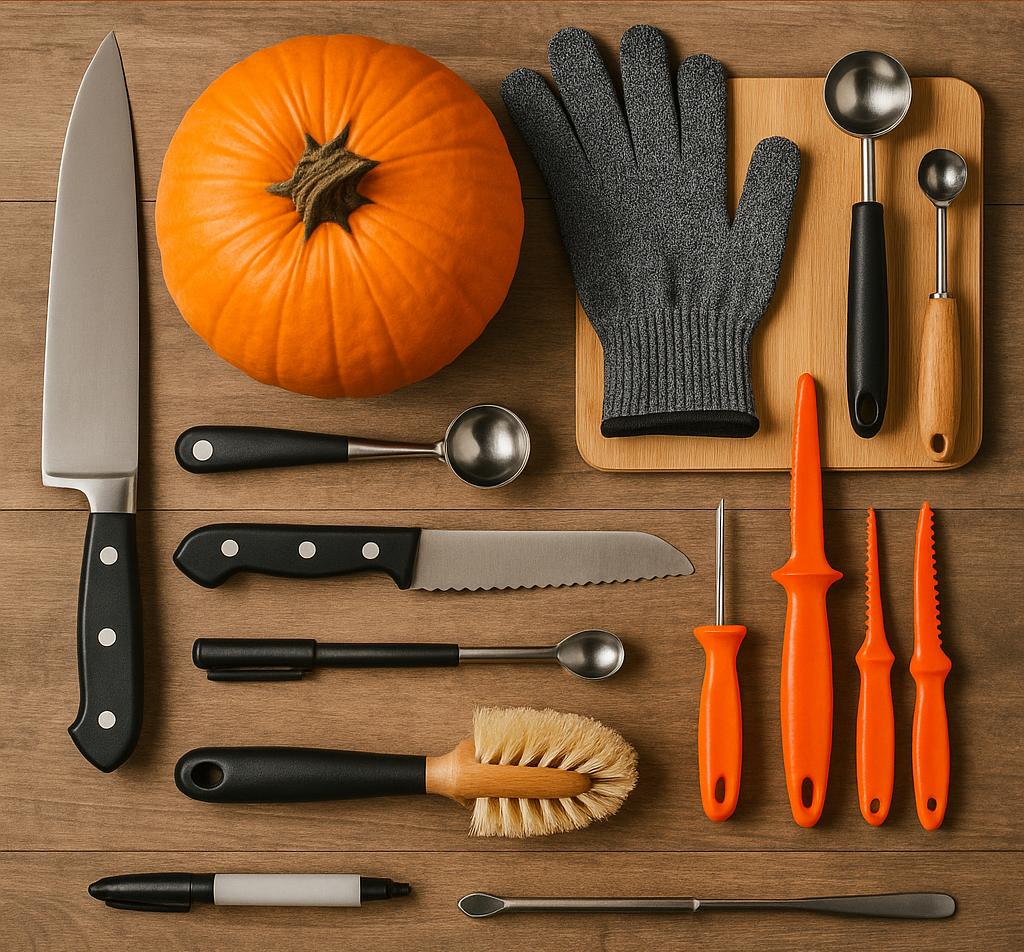
For a cooking pumpkin, start with a stable cutting board, a sharp kitchen knife you can control, and a sturdy metal spoon. A special pumpkin gadget is useful only if it solves a problem those tools don’t. Carving and crafts need a separate kit, especially if paint or glue is involved.
As an Amazon Associate, Pumpkinish earns from qualifying purchases. These are buying suggestions based on the task, not products Pumpkinish claims to have personally tested.
Start with the board and the pumpkin
A board that slides makes every cut harder to control. Choose one large enough to support the pumpkin and your hands without hanging over the counter. A damp cloth underneath can steady an ordinary board; wipe up slippery pulp as you work.
Wash the pumpkin under running water before cutting. A clean produce brush helps remove soil from the grooves. Keep food preparation separate from a craft table where glitter, paint, or adhesive has been used.
A small cooking variety is easier to handle than a giant display pumpkin. If the fruit is too hard or large for a controlled cut, choose smaller pieces sold for cooking or a smaller pumpkin. Forcing a blade is not a necessary step in making soup.
Cutting tools for cooking
A kitchen knife that fits your hand
A sharp chef’s knife is useful for manageable cooking pumpkins and later chopping. An 8-inch blade is a common starting point, but grip, balance, and your ability to control it matter more than a particular length or a premium label.
Look at handle size, cleaning instructions, and sharpening needs when comparing chef’s knives. A larger knife can be less manageable for smaller hands. A knife you already use confidently may be the better choice.
Keep fingers away from the blade path, stabilize the pumpkin, and make deliberate cuts without twisting a trapped blade. Never hold a pumpkin in your lap to cut it. If the knife wedges, stop and reposition safely rather than striking or forcing it.
Serrated knives, cleavers, and electric knives
A serrated blade can help with some surfaces, but it can also bind or wander in dense rind. It does not make a cut slip-proof. A heavy cleaver adds weight and requires control; it is not an essential beginner purchase.
Electric carving knives are designed for particular cutting tasks. Do not assume they are rated for hard pumpkin rind. Follow the manufacturer’s permitted uses and keep cords clear of wet work. Reciprocating saws and other workshop tools are not recommended here for home food preparation or a family carving session.
Scooping and cleaning
Try a sturdy metal serving spoon before buying a scoop. A rigid handle and a bowl that fits inside the pumpkin matter more than the name on the package. Thin spoons can bend; a very sharp scraping edge can remove more flesh than you intended.
A food-safe pumpkin scoop may be useful for several pumpkins at once. Check that the surface can be cleaned thoroughly and that the handle is comfortable when wet. An ice-cream scoop can work, but spring mechanisms tend to collect stringy pulp.
A colander helps rinse seeds for roasting, and a bowl beside the board keeps scraps from piling up under your hands. Do not repurpose a used paint scraper for food. For crafts, keep separate, clearly marked tools.
Cooking and preserving supplies
A rimmed roasting pan catches liquid and is easier to move than a flat sheet loaded with soft pumpkin. Choose a size that fits your oven with room to grip it. Use oven mitts and keep the pan’s weight manageable.
A potato masher works for rustic purée; a food processor makes a smoother batch. An immersion blender needs enough depth to avoid splashing, and it will not do much for hard, undercooked pieces. Hot liquids can create pressure in a closed blender jar, so follow the appliance’s instructions and cool as needed.
If you already have a blender or masher, you don’t need a stand mixer just for purée. See the stand-mixer comparison if your real need is frequent dough and batter mixing, or the Dutch-oven guide for soup-pot considerations.
For storing cooked pumpkin, choose freezer-rated portion containers or bags that fit your usual recipes. Ordinary decorative glass jars may not be freezer-safe. The preserving guide explains quick cooling, labeling, and why purée belongs in the freezer rather than a home-canning jar.
Carving tools and a safer family setup
A small purpose-made pumpkin saw and scoop are usually enough for a simple face. Look for sturdy handles and age guidance when comparing manual carving kits. Lots of tiny attachments can mean more sharp pieces to track, not better results. Thin saws can bend or break if twisted.
Work on a dry, stable surface with good light. Follow the kit’s directions, keep the supporting hand clear, and make small, controlled cuts. Adults should handle cutting; children can draw a design or scoop with an appropriate blunt tool under supervision. A washable marker, paper stencil, and flexible tape are enough for marking. A melon baller is optional for rounded details.
Cut-resistant gloves can offer some protection, but they are not cut-proof or puncture-proof. “Level 5” is incomplete without the named testing standard. Check fit, grip, food-contact suitability where needed, and the manufacturer’s limitations. Gloves do not make power tools or forceful cutting safe.
For display lighting, choose a cool LED made for the intended setting and keep battery compartments dry. Carve near the event because cut pumpkins have a short display life. See harvesting and storing carving pumpkins.
Crafts, marking, and cleanup
For a no-carve project, start with decoupage pumpkins. Keep glue brushes, paint, craft knives, and sealers in a separate tray. A faux pumpkin may be a better base for a decoration you want to reuse.
Washable does not mean edible. A pumpkin treated with craft materials should stay a decoration. The pumpkin kitchen accessories article has ideas for reusable serving and decorative pieces when you want the autumn look without processing fresh fruit.
Clean food tools promptly, dry blades, and follow the care directions. Use a suitable sharpening system rather than one that is incompatible with your blade. Store knives in guards, a block, or a secure rack away from children; don’t leave loose blades buried beneath seasonal supplies.
What to buy first—and what can wait
For one cooking pumpkin, use the board, knife, spoon, and roasting pan you have. Add a stable board or comfortable scoop only if the existing one is awkward. For repeated preserving sessions, containers and clear labels are likely to help more than another cutting gadget.
For carving, buy a modest manual kit and organize a safe workspace. Detailed tools, specialty scoops, electric appliances, and storage cases can wait until a specific task calls for them.
A good first project is a small roast-and-freeze batch for pumpkin bread. If you also grow the pumpkins, the garden-tools guide covers the pruners and gloves used before the fruit reaches the kitchen.